Pictures Look Better Printed (Than on the Screen)
During this week away at work ‘down south’ I overheard from the conversation next to me in the lunch room someone saying how much better pictures look when they are printed; compared to looking at them on a screen. I had to bite my tongue to stop myself from butting in and trying to explain the three basic reasons why this is so, but I made a note when I got back to my desk to do a quick post on this topic.
It’s true: About 95 percent of the time—unless someone totally messes up the pre-printing preparation of the picture—all pictures look ‘better’ when printed.
There are three really basic reasons for this and I am going to attempt to explain them each in as few words as I possible can.
(1) DPI

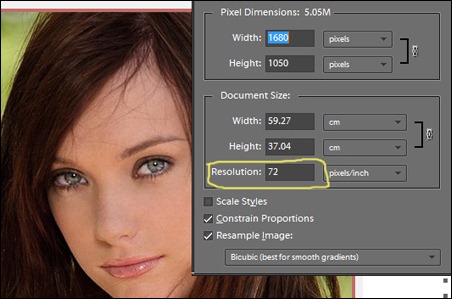
To check your screen DPI you can do a screen grab (using the PrtScn key) and then paste it into your favourite raster image editor. Then use the resample or resize dialogue option, wherever that is in your image editor, and you will see it is most likely 72. In my case I used Adobe P
Compared to the 72 dpi of a screen the typical inkjet colour printer prints at a minimum of an effective 300 dpi which is over 4 times the dpi density of a typical 72 dpi screen, and many modern inkjet printers print at an effective 600 dpi and higher.
Y
(2) RGB vs. CYMK
All computer and TV screens ‘create’ their colours using what is known as the additive red, green, and blue (RGB) primary colour model. In this model if all three colours are blended at full (100%) intensity then you get ‘white’. If all three colours are missing (off) then you get ‘black’ (or very close to black anyway depending how ‘black’ your screen is—and many screens are not very black; check yours the next time the power is off and compare the dead screen to black).

The upside of the CYMK model is that you can get a truer white, depending on the whiteness of the stock being used (which is code for the paper being used), and you can get a much blacker black than any monitor or screen allows.
Apart from anything else this ability to get whiter whites and blacker blacks when printing, compared to those on a screen, makes a huge difference to any picture.
(3) Colour Correctness
Providing you did a reasonably good job of installing your printer and the correct driver has been set up, and you use a ‘smart’ program to print your pictures, then it is most likely that your printer prints colours more accurately and faithfully than the colours you see on your screen. So when you print something the colour hues are more likely to be closer to how you thought they should be than when you view them on a screen. Hence they look ‘better’.
Most computer screens are set too bright because, for some reason, doing our normal work with Excel or Word or surfing the Web, we like to have a brighter screen (even though this is actually a bad thing, but that is a whole different topic). It also doesn’t help, that for sales and impact reasons, when you buy a screen and connect it up it will almost always be set up ex-factory in “Vivid” or “Saturated” mode. This makes normal screens look awesome and full of what appears to be ‘solid’ vibrant colour (but is really over-bright or saturated colour), but it is not good for the faithful presentation of pictures on the screen.
On the other hand, out-of-the-box, most printers are calibrated to give as faithful as possible colour rendering assuming you are using the manufacturers inks and the recommended papers (and it DOES make a difference when you don’t—it just depends if you can put up with the difference it makes; which in some rare cases can actually be an improvement).
So. There you have the three main reasons why, in most cases a printed picture looks better than when it is viewed on the screen. There are other minor reasons, such as viewing distance, that contribute as well but I won’t go into them.
There are exceptions, such as printing a picture that has a very low starting point resolution; but for most pictures you are going to take with a modern digital camera of any kind, including those cameras embedded in phones, etc., the above holds true. There is also the exception of when your printer colour profiling is not setup correctly or has been badly adjusted, but this will only generally occur where people who have no idea how to adjust printer colour profiles start messing with the the ex-factory profiles of the printer or the provided printer profile files.

