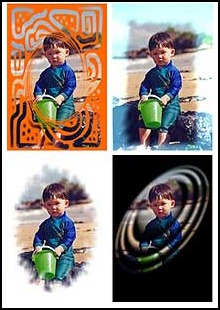
Part 1: ‘Framing’ Photographs (Digital-framing)
Although most people who post-process their pictures refer to this as ‘framing’ or a digital frame, really, in the proper use of the word frame, it is not really a frame. To me a frame incorporates a sheet of glass or plastic and you can take the picture out of it and put some other picture in it—if you want to. In digital photo-finishing what we are actually talking about when we say ‘framing’ is just a border around the picture. I tend to prefer to use the full term of digital-framing or a digital-frame, and sometimes I just call it a border.
According to Adobe’s guide on photo-finishing basics, either forgetting to add a border or just totally not considering adding a border, is in the Top 5 basic mistakes that people make when they do post-processing work on a digital picture. I think you will find, if you go back through my blog, that every picture is ‘framed’—I have added some kind of border to every picture. Even if this frame is simply a 2 or 4 pixel black outline.
The way I see it digital-framing comes in two basic varieties. There is fancy artistic type framing and there is ‘solid’ outline framing. The general recommendation is that unless you have a special use or purpose in mind then solid outline framing is generally the best option.
Artistic (fancy) digital-framing
With almost all of the top end photo finishing tools there are heaps fancy pre-built digital-framing options included. In the case of Adobe Photoshop there are thousands (probably tens of thousands) of options when you take into account all of the scripted framing utilities created and shared by people who use Photoshop. Many of these are free and some of them cost money.
There are the classic ragged torn, ragged cut, or burnt edge effects, then there are the ‘tube’ or brush tools that allow you use some other image to brush a border around the edge (using flowers or stars or birds or whatever). You can also use Photoshop layers and edge effect and use some other picture as the ‘frame’ for the main picture.
The options for artistic fancy framing are basically only limited by what you can imagine.

Or, if you are a fan of Corel’s PhotoPaint package then you can find ways of adding fancy frames using Corel by clicking on the picture at right.
But this is only a tiny sample of what is available. If you use PaintShopPro or ACDSee or Picasa or Photoshop Elements or Paint.NET or PhotoScape of Photo Impact or any of the twenty or so leading photo editing packages then there will be blogs or forums covering ways of adding or creating fancy frames. Just do a search of the Web using suitable key words and you will find many sites covering fancy frames.
Outline or Solid Framing

If you go to a serious photography site like photo.net I doubt that you will find many photographs that have been fancy-framed. Certainly less than 5 percent, and probably even much less than that.

To give credits, as one should always do in such cases, the first picture was taken by Boeboe Fiel, the second by Alexander Kuzmin, and the third by Craig Hutson; all from photo.net.
In the first picture the digital-framing is the classic thin black border, then a larger white border, followed by a much large final black border. This is why it is called a layered outline frame. There are three layers.
In the second picture there is a thin yellow border, which you almost cannot make out in this 50% reduced size version. I suspect it was sampled from the girl’s dress. Then there is a wider green border, I suspect sampled from the green leaves we can see in the foreground. Then a final thin black border.

Someone might ask the question: “why don’t serious photographers use fancy framing?”
There are two main parts to the answer. The first is that fancy framing, unless very well done and done to fit the mood or essence of the picture, almost always distracts from the picture. I pulls part of the viewer’s focus and attention away from the picture. This is obviously something that a photographer does not want to happen. In fact the primary purpose of digital-framing is to draw the viewers attention into the picture and give the picture a ‘hard’ boundary.
The second part of the answer is that depending how the image is to be used, any ‘fancy’ framing that is to be done will be done later by someone or something else “at another level”. For example, if the finished image is to be used in a Publisher document, then any fancy framing required will be done in Publisher using Publisher, ditto if it is to be used in PowerPoint, or Corel, or Adobe Illustrator, etc,. Even if it is to be used on a Web page, generally most Web page layout tools offer some form of optional fancy framing. Or if the image is actually to be printed and framed for real then the ‘fancy’ framing will be the physical frame. Ditto if the image is to he mounted using framing card (a.k.a. mount board) to go into a physical presentation portfolio.
In Part 2 I will briefly cover some tips for outline framing.


