
Windows 7 Upgrade for Windows XP Users: How It's Done (P2)
Post length warning: Following is a long semi-technical post that is likely only to be interesting to someone thinking of upgrading a Windows XP PC to Windows 7.
This post follows on from my previous post on this subject [Ctrl+Click to open in a new Tab]. My previous post introduced the idea of “upgrading” from Windows XP to Windows 7 and talked about the difference between Upgrades and Fresh Installs of a new operating system version.
In my previous post I made the point that there is no technical upgrade from Windows XP to Windows 7. So, even though you can buy a license pack that allows you to legally upgrade from Windows XP to Windows 7, the disk in the package does not actually let you do a technical upgrade from Windows XP to Windows 7.
So! What can you do with a Windows 7 Upgrade package if you have Windows XP installed on your computer?
Your only option is to do a Fresh Install, and—as it happens—the Windows 7 upgrade package and DVD provided allows you to do this.
Following, in four parts, are my simplified (cough) steps for “upgrading”—which is really a Fresh Install—your Windows XP computer to Windows 7.
Part One
- Set aside at least a day to do this.
- Turn the coffee machine on and start some coffee happening (or, for those in the UK, if you prefer, start brewing some tea).
- Organise your wife/husband or girlfriend/boyfriend to bring in lunch at the appropriate time.
- Count backwards from 10 slowly while dropping your shoulders.
- Start up your Windows XP PC.
- Download and run the Microsoft Windows 7 Upgrade Advisor from here [Ctrl+Click to open this link in a new Tab].
The Windows 7 Upgrade Advisor needs to be installed. Once it has installed then you need to run it. After it has run it will provide a list of potential issues that you are likely to encounter if you go ahead and upgrade your Windows XP computer to Windows 7. The main issues are likely to relate to device drivers required by your computer that are not bundled in the Windows 7 installation.
It is up to you to decide, after looking at the report from the Windows 7 Upgrade Advisor, if you think it is safe to go ahead and install Windows 7 on your computer.
The main thing is to ensure that you have the disks for any of the missing device drivers identified by the Upgrade Advisor.
Assuming you have digested the results from the Windows 7 Upgrade Advisor and think it is okay to go ahead and install Windows 7, then move on to Part Two.
Part Two
- See point 4 in Part One.
- Back up ALL your data on the system drive (which is usually C:). This means data under \My Documents (unless you have moved \My Documents off the system drive) and well as any data you have stored under the ‘root’ (C:\) that you want to keep.
- Double-check the computer file structure using Windows Explorer and be sure you have a copy of all the data you want to keep. Think about stuff like:
> Word, Excel, PowerPoint, Publisher, Access, etc., files.
> Pictures from your camera or your phone.
> Music.
> Videos (DVDs you have converted to MKV/AVI/H.264, etc.,).
> Videos you have downloaded.
> Anything else (torrents, etc.,) you have downloaded that you want to keep.
> Mail files (from Outlook Express or Outlook or whatever). - Make a note of all the programs you have installed on your computer and be sure that your have the media (CDs or DVDs or whatever) and licenses (keys) so you can install them again on your Fresh Installed Windows 7 computer—because they are all going to be gone when you do the Windows 7 install.
- Go back and check again that you have backed up all the data you want to keep.
- Have a coffee or cuppa tea, and a biscuit (low sugar biscuits for those of use with Type 2 diabetes).
- Go back and check again that you have backed up all the data you want to keep.
- See point 4 in Part One.
- Go back and check again that you have backed up all the data you want to keep.
Part Three
We are now at the point of no return. Once you start working through the following points any data on your system disk, and all installed programs, are going to be gone.
- Turn off/shutdown your Windows XP computer, insert your Windows 7 upgrade DVD into the DVD drive, turn your PC back on, and boot from the DVD. If your PC does not offer the option to boot from the CD/DVD then: (a) you may need to make a change to the boot order in your boot BIOS (get help if you don't know how to do this): or (b) your PC does not boot from optical media (in which case it is probably too old for Windows 7 anyway).
- When Windows 7 starts up from the DVD and asks about “Upgrade” or “Custom” install then pick the Custom install.

- From the next screen select “Drive Options (advanced)”.
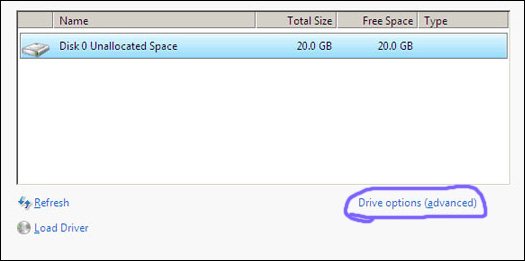
- From the next screen select “Format”. This will do a quick format of the system drive and prepare it for the install of Windows 7.

- At this point Windows 7 will start to fresh install onto your system drive.
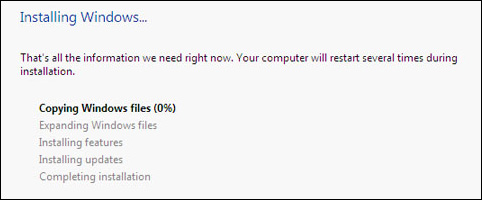
- From here you just follow the prompts until Windows 7 has completed fresh installing on your PC.
- At this point you need to install any device drivers that were not found and installed by Windows 7 as advised by the Windows 7 Upgrade Advisor in Part One.
Part Four
At this point you have Windows 7 fresh installed and running on your PC. Now you need to work through the following.
- Leave your PC connected to the Internet for a decent period (at least 30 minutes). During this time it will download and install any Windows 7 critical updates and also any later or special drivers required for your PC will be detected and downloaded.
- Install any updates downloaded.
- Check any suggested new drivers and install those you think sound like they are needed—especially graphics drivers, network interface card drivers, and sound drivers.
- Restart your PC to make sure any updates are fully installed.
- See point 4 in Part One.
- Install your anti-virus scanning software. If you don’t have any anti-virus scanning software then install Microsoft’s free, and highly regarded, anti-virus scanning software. This is called Microsoft Security Essentials and can be obtained from here [Ctrl+Click to open in a new Tab].
- Once you have virus protection installed then, one by one, re-install your applications/programs, rebooting from time to time as required. Only re-install those programs you actually need and use.
- Once you have all your applications/programs re-installed then start putting your data back. This includes \My Documents and any data from anywhere else on the disk that you need to put back.
- As you install each program you should test run it. Some programs need some post-installation configuration work to be be done and you need to run each of them to check if this is the case.
- If you are going to use Internet Explorer 8, which was installed as part of Windows 7, then you should launch it and do any configurations necessary.
- If you are going to use Windows Media Player 11, which was also installed as part of Windows 7, then you should launch it and set any configurations neceassary.
If you started at 9:00 a.m. then by now it should be about 6:00 p.m. If this is not the case you may have missed some steps. Go back and check.
Well that is about it—but the devil is in the detail, and I cannot go into the detail here as that results in a 150 page book.
If you want more information then I recommend you go to Paul Thurrott’s Windows Super Site and go through the Windows 7 pages [Ctrl+Click to open in a new Tab].
Other than that, get someone else, who knows more about computers than you do, to do it for you.
![]()