Digitising My Photos: Part 2—Previewing Negatives
As I pointed out in Part 1 (here) one of the big problems with undertaking the project of digitising all of my negatives is how to preview them. That is, how to work out which of the tens of thousands of frames that I have on negative strips will I actually take the time to digitise.
Many of the frames taken on a roll are what us photographers call ‘safety’ shots. These are three or four or more additional shots taken at different settings and angles just to ensure we got the picture.
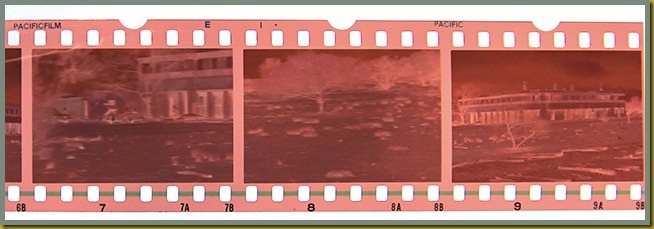
Previewing negatives to work out which frames to tag for digitising is not as easy as previewing slides. With slides you can just run them through a slide viewer or, if you still have one, a slide projector. But because negatives have all the colours reversed (hence the name ‘negative’) plus they have the orange/yellow masking layer (see above), you can’t just hold a negative up to the light or use a light box to see if they are more or less in focus, correctly exposed, and probably worth the effort of scanning.
Remembering that a medium density full-frame scan of a single negative or slide takes about five to eight minutes to complete (depending on the settings selected) then at five minutes a frame a single 36 frame roll of film would take about three hours to digitise if every frame were digitised.
So what I have decided to do is use one of the ‘cheap’ $89.95 price-point negative/slide scanners you can get from Harvey Norman, Office Works, or Target and use that to preview my negatives. Although these scanners only effectively scan at about 300 dpi optical (despite whatever grand claims they may make on the box) this is good enough to do a preview check. Also, as they scan at such very low resolutions they can do the preview scans in three or four seconds per frame.
The unit I have purchased to do the previewing of negatives is the Otek PS900 Combo unit pictured below alongside a cup of coffee so that you can get some kind of idea of the size.
The negatives are previewed as you slide the negative holder (shown on the right hand side in the above picture) through the unit. It takes about two to three seconds for the unit to ‘settle down’ as it shows each negative on the computer screen in a relatively small window.
Following is a capture of the preview window from the Otek in 1:1 (actual) size so you can see how big the preview is. This is the number 9 frame shot from the negative strip above. It has not been enhanced or edited in any way. This is exactly how it looks on the screen.
To put this into perspective following is a capture of my entire 24” 1920x1200 screen so you can see how big the preview is relatively on the screen. It is not very big but it is probably just big enough to use for previewing my negatives.
The following link is to an AVI video that I captured that shows, in real time, how the negatives are previewed by the Otek unit. The four frame strip is the same strip I have shown above. Clicking the link will cause the AVI to download and then open in whatever is your default video player for AVI videos (usually Microsoft Media Player on a Windows XP or Windows 7 computer).
There is no sound so don’t think that your speakers are not working
[[AVI video previewing negative strip]]
This is a 3.5MB load and may take about 15 seconds or so to download and start playing on a regular ADSL link. It will take about a minute to start on a 256kbps satellite link.
So, for example, on this strip, which features pictures taken of the Big Bell Hotel back around 1975, I would most likely only digitise the first and last frames. The other two frames appear to be of a flock of pink and grey cockies (a.k.a. galahs) flying by (can you see them?) and I have no interest in digitising them.
Next I will be testing out the actual negative scanner itself. That is going to be interesting. I will be getting one of the PlusTek units but I have not made a final decision on which of the seven different units available (including superseded but still available units) that I will go for yet. I would like to have been able to get one of the automatic feeding units that I could load up and then let it scan overnight, but they are still up around the $1,500 mark and higher and that is a bit too expensive for me.


