
Digital Darkroom: Saving Images 101
Warning:
Long but really important post if you want to get the best possible results when editing or modifying your digital photographs.
Editing and then saving digital photographs would seem to be a simple thing to do. Crank up your favourite picture editor, make your changes, and save them. Surely this is all there is to it?
This is basically true, but there are a couple of things that you do need to think about. The first of these is to take care never to overwrite your original pictures; the pictures you copied onto your computer from the camera (memory card, or whatever). These are the pictures that the camera took. You should think of these pictures as the master pictures and take care never to purposely or accidentally overwrite them when you are doing any picture editing.
Typically the pictures from your camera will be JPG (JPEG) format images. Those people with more advanced cameras are able to take “digital negatives” or what are referred to as “RAW” image files. These files generally have different file extensions depending on the make of camera and are typically much larger—up to three times, or more, larger—than the JPG files. For Canon cameras these RAW files generally have the extension .CRW or .CR2, and for Nikon they are .NEF or .NRW. Pentax use .PEF for their RAW image files.
Some cameras allow you to use the Adobe general digital negative format which has the extension .DNG on all cameras that allow it.
For a reasonably complete list of cameras and their RAW formats you can check this entry on Wikipedia [Use Ctrl+Click to open in a new Tab, or Shift+Click for Opera users].
If your camera does allow you to take digital negatives then I would encourage you to use this format when you are taking important pictures; pictures you really want to get the best out of. This is because once a picture is compressed down to the JPG format by your camera and written to your memory card a lot of really useful information the camera captured when the picture was taken has been thrown away for good. This is information about the picture that can never be put back—even by the best image editing programs. If you have the digital negative—the RAW—then, if you know how (and I do not go into this in these posts), you can recover and enhance parts of the picture that are totally impossible to get back when working with a JPG.
Anyway, working with digital negative images is beyond the scope of these basic notes on image editing. Getting back to saving, every time you save an edited picture you should give it a new name, and I suggest that the new name should indicate what has been done to the picture. Some picture organiser programs like PhotoShop Elements, ACDSee, and Google Picasa, and many others, try to make sure you do not overwrite your original image file. They will generally warn you in some way if you purposely or accidentally try to save a newly edited file over an existing picture.
The problem is that each time you save a JPG file a little bit more information is lost. Even when you have the JPG quality slider set to maximum quality (12 in PhotoShop, 100% in ACDsee), some information is still discarded when the image is saved. This is because, even when set to maximum quality, saving a JPG file still causes some degree of averaging or smoothing to occur—even if it is minimal. Hence if you opened a JPG file from your camera, did no editing, and saved it back, a little more information will be lost from the newly saved file. And if you just overwrote your original picture then you have no way now of getting that lost picture quality information back—unless you still have it on the memory card in your camera and think to take another copy onto your computer (and who does that?).
The following two images illustrate what I am talking about above. The first image is the “original” image. The second image is the same image after it has been saved 70 times as a JPEG file. Even though the sliders were set to maximum (I used PhotoShop Elements with the slider set to 12), after 70 saves the image has degraded.
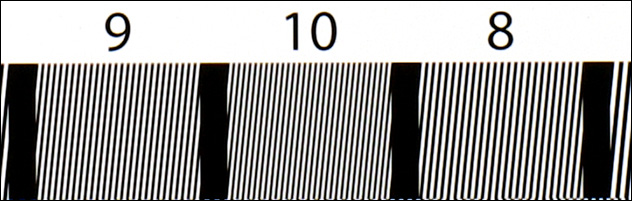
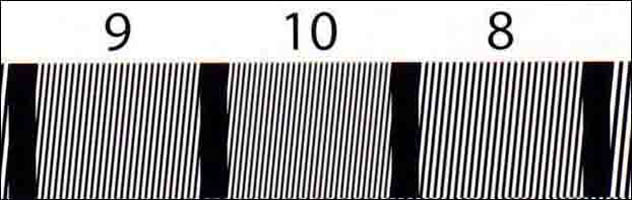
Notice in the second image that the black lines no longer have crisp edges, that the white has become foggy or a little grey-ish, and that there are pepper dots appearing between the black lines. Also there are aberrations appearing around the numbers and along the top of the striped bar. Admittedly it has taken 70 saves before this image got this messed up, but that was with the “Save As” quality slider set to maximum. If this slider had been set lower then, after 70 saves, this image would have lost a lot more clarity and would look a lot worse.
So, when editing, always work from you master file and never overwrite it.
Naming Files
When you save edited files it is generally useful to encode into the file name some idea of what editing has been done to the file. As the main three things you are likely to do are Crop, set the Levels, or Resize and Sharpen for Web or Print then I suggest using the letters C and L followed by rW (resized for Web) or rP (resized for Print) at the end of the file name to indicate what status the saved file is at. I am not too sure why I decided to use a lower-case “r” for resized, but for some reason I did.
A final tag I often put on files is the height of the picture in pixels or millimetres. This is shown as a “y”, indicating the y axis (height) followed by the number of pixels or millimetres high the picture is. I usually put another hyphen “-“ between this and the previous coding. Pixel height is used for Web pictures and millimetre height is used for print pictures.
So, if I were looking at my file list the following files might be seen.
|
File name |
Indicates |
|
IMG_10344-CLrW-y300 |
This picture has been cropped, levelled, and resized and sharpened for use on the Web, and it is 300 pixels high. |
|
IMG_11487-rP-y15 |
Picture has been resized and sharpened for print at 15mm (therefore most likely on 15x10mm or 6x4” paper). Note that no cropping or levelling was done. This picture was just resized as it was. This is quite unusual. |
|
IMG_11005-CLrP-y29 |
Picture has been cropped, levelled, and resized and sharpened to print on 29mm tall paper—which is A4 paper. |
|
Tiff Orange Heels 18-CLrP-y15 |
With this picture I have replaced the camera shot numbering with a more meaningful name for the picture, but the cropping, levels, and resizing and sharpening for printing on 15mm high paper coding is still the same (at the end of the file name). |
|
Tiff Orange Heels 18-CLrP-y29 |
This is the above picture but it has been prepared for printing on A4 (29mm high) paper. While it is usually safe to print a picture prepared for a larger paper size on smaller paper, printing a picture prepared for a smaller paper size on a significantly larger paper size will typically result in a disappointing print. Note also that the second edit of this picture would have started with the original master image and not with the already edited y15 image. Hence the reason to keep your master images and not to contaminate them. |
This is likely to sound all too hard at first. But it is really easy. It also sort of ensures that you don’t overwrite the original picture file. And you don’t have to use my file coding system. There are many other ways of naming files so you know how and why you prepared them. Make up your own file coding system.
Some programs let you tag the pictures within their built-in organiser, and while this is a good idea as well, it is still useful to actually tag the file name of the file. This way you can still get some idea what has been done to the pictures even when you are not using the editing program’s built-in organiser to find and open picture files.
The importance and impact of preparing pictures for Web or printing will become clearer in the future posts.
That’s it for what I wanted to say about “Saving”. The next post is about Cropping.